Tuesday, December 21, 2010

Coming Up for Air/Holiday Goodies


So much for keeping up my blog! This past semester really kicked my "you know what!" In addition to teaching three math classes at a nearby high school, I was taking classes of my own, and trying to study for the "math test from hell," which would label me as "highly qualified" to teach secondary math in the state of AZ. Oh, and throw in the normal, everyday household and child-rearing stuff. And since I wasn't quite busy enough....I was training for a 1/2 marathon.

Sanity? Saaaaanityyyyyyyyyyyyy! Where aaaaaaaaaaarrrrreeee yoooooouuuuu?!?

Oh! There you are....buried in my crap storage sewing room!

Now here we are, on a two week winter break. The 1/2 marathon is run (2 hrs and 18 mins!), the monster test is taken (and passed....woo hoo!), and I'm not taking any classes at the moment. Time to catch up on some projects!

And the first one to tackle was teacher gifts. I pulled out two of my most fave tutorials.


First, the lanyard tutorial from my dear friend Tracey over at sew.simply.creative. I've used this one many times now, and it's always a crowd pleaser!

I let my kids go through my "stash" and choose the fabrics that they thought their teachers would like. This is what we ended up with:


Next, I pulled up my other favorite tute, the tea wallet from Is It Naptime Yet? I used the fabrics my kids chose, paired with coordinating fabrics. Then I filled them with a variety of teas.


And of course you need something to drink the tea out of! I just love these reusable mugs that have that coffee shop "paper cup" look with the convenience of a dishwasher-safe plastic!


And we all know one of the best (and most important!) parts of gift giving is the presentation. I found these adorable apple ornaments at JoAnn fabrics, so I added the teacher's names on the front and a message from my kids on the back and used them as the gift tag. The gift bags are just basic drawstring bags made from some cute Christmas fabrics.


I think they turned out quite nice and the teachers loved them!


Happy Holidays!

Wednesday, September 15, 2010

Where Oh Where Has My Little Blog Gone?/Chicken Little

SOS!!!! My blog has been hijacked by life!!!

I know, I know. I said that when summer rolled around, I would get back to it. Well......

Summer was CRAZY busy around here. Camping trips, Disneyland, Las Vegas, swim team....it just flew by too quickly. My kids have been back in school for just over a month, and life doesn't seem to be slowing down. I'm still taking classes working toward my teaching certificate, and just last week I started teaching two math classes as a long-term substitute for the same school I subbed at in the spring. So once again, my plate is full.


But I have missed sewing and crafting, and I have really missed sharing it all here on this blog. So I am still going to try to keep it going. My projects may not be as big and my posts probably won't be weekly, but I'll still be around and I hope you will be too!

Chicken Little

My mother is an avid yard-saler/thrift-storer/antiquer (I think I just made up those words). She always finds the best things, and she has more stuff than she knows what to do with (I'm going to send American Pickers to her house one of these days....). So anytime I go to her house for a visit, I shop. And I always end up coming home with a box/car load of stuff (much to my husband's dismay).

This summer when I was there, I saw these chickens hanging out on the buffet table in her dining room.


And I suddenly had to have them. Don't know why...I don't collect chickens. I just really liked them. She picked these up at a yard sale. Someone, somewhere, sometime carefully hand-stitched these.


So I kidnapped these and brought them home. Now to display them. I started with a frame that I picked up for 1/2 price at JoAnn's.


Next I grabbed some burlap from my "stash" that I had left over from who knows what and my trusty glue pot.


I removed the matting from the frame, and then using hot glue, I covered the cardboard insert with the burlap.


Then I placed my chickens on the burlap, using a little piece of tape on the back to just hold them in place while I put the frame back together.


It took about 10 minutes from start to finish and I think it's quite a cute addition to my kitchen hanging above my baker's rack (another thrift store project!)


What do you think?

Saturday, April 3, 2010

Missing In Action


I know, I know. I've been Missing in Action....for about a month. So why I did I just drop off the grid? Well, where do I start?


A few months ago, I decided that I'm ready to re-enter the work force. Both of my kids are now in school all day, and although I have lots to do and can keep myself busy, I was feeling a little lost. So I took steps toward doing something that's always been in the back of my mind....get my teaching certificate. I have a B.S. degree (writing B.S degree always makes me giggle....so much of college really was BS!) in Civil Engineering, which means I have a bazillion math credits. One class shy of a Math minor. So what do I want to teach? High School math, of course.

First thing I did was obtain my Substitute Teaching Certificate, thinking I could sub a couple days a week to pay for my classes.

Well.....

A good friend of mine is head of the math department at a high school not too far from my house. They had a math position open up when the long-term sub in that class just didn't work out. Did I want the position? I would have been dumb to pass up the opportunity.

The long and short of it: I am now teaching 3 Geometry classes and 2 freshman Honors Algebra classes until the end of the year. It's hard...but rewarding. I'm their third or fourth teacher this semester, and they certainly have tried to get to me. I have one class full of horribly behaved challenging kids that might drive me to drink, but there are enough great kids that I'm really enjoying it. Plus I can count my hours in the classroom toward some of my coursework on my teaching certification.

So right now, I'm working full-time and taking classes. Doesn't leave much time for sewing. :( But when summer comes around, and the school year ends, I'll be back at it!

Wish me luck and Happy Sewing!

Monday, February 22, 2010

Wrap It Up! A Reusable Sandwich Wrap Tutorial

This is only my second attempt at a tutorial (my first, a hooded towel tutorial, can be found here), so bear with me!

Today, we tackle what has become an invaluable item in our house: the reusable sandwich wrap. As I've written before, the idea behind these isn't new. Pioneers had to wrap their lunch in something. The beauty of the sandwich wrap is that not only do they cut down on the number of plastic baggies that you use, but they give you a nice, clean surface to eat on....a portable placemat! And they add some cuteness to the lunch box.


So here we go. The way I like to make my sandwich wraps.


You will need:


  • Fabric of your choice for the outside

  • Washable (or wipeable) moisture-resistant fabric of your choice for the inside [I use rip-stop nylon, but you can use laminated cotton, oilcloth, vinyl-coated fabrics, or PUL, just to name a few]

  • rotary cutter (or scissors) and ruler

  • velcro

  • thread (I always use white...you'll see why later!)


First, cut your two fabrics into 12" by 12" squares using your rotary cutter or scissors.


Why a 12" x 12" square? Because my engineer (in a former life) brain likes nice, neat, even numbers. And 12" goes so nicely into a yard, don't you think? It just maximizes my yardage. And I have found that unless you make giant "Dagwood-style" sandwiches, this size sandwich wrap works just fine.


Next, we need to cut your velcro. You need a 2" piece of the "fuzzy" side and about a 3/4" piece of the "rough" side.


Now it's time to attach the velcro pieces. Your 2" piece is going to go on the right side (printed side) of your outside fabric. Using a ruler, center the velcro along the diagonal, about 1-1/2" from the corner. Pin.


The 3/4" piece of velcro will be attached to the right side of the inside fabric. Again, using your ruler, center the velcro along the diagonal about 1-1/2" from the corner. Pin.


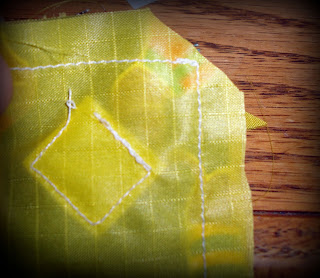
Now it's time to sew! Stitch around all four sides of the velcro. And this is why I use white thread....so it won't show on my white velcro.


Repeat for the inside fabric.


Place your two squares right sides together, making sure that the two velcro pieces are at opposite corners diagonally from each other.


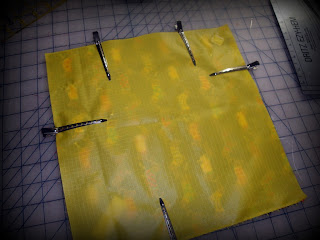
Now, you can pin it into place. But depending on what fabric you've chosen for the inside, you may not want to prick holes in it with pins (some plastic type fabrics are not self-healing and you don't want holes showing later). So I use some alligator-type hair clips to hold my squares together while I sew.


Stitch around all four sides, leaving a 2" (or so) opening in the middle of one of the sides.


Clip your corners. Be careful not to cut across your stitching!


Turn the squares right side out through the 2" opening, using a bodkin, pencil end, crochet hook, or some other object to get the corners. Then press your sqaure on the outside fabric (if your inner fabric has any plastic in it, it will melt!)


Finally, the finishing touch. Topstitching! You could skip this step if you want, but I think topstitching just finishes it off. I so love topstitching.


Now you're ready to wrap something up! Just place your sandwich in the middle, fold in the two sides (the sides are the non-velcro corners),


Fold up the bottom,


Then fold down the top!


And there you go. A reusable sandwich wrap!


Now go start sewing!

Monday, February 1, 2010

Be Mine

My poor, little neglected blog. I didn't mean to leave you unattended so long, but this darn thing called "life" keeps getting the way. Kids, housework, running a 1/2 marathon.....etc. etc.

I have been sewing, I just haven't had time to stop and write about it. What have I been working on? Valentine's Day.


Last summer I found this adorable Alexander Henry "For My Valentine" fabric on the clearance rack at the fabric store. I just love the vintage look of this fabric.


It was only a couple bucks a yard, so I bought the rest of the bolt, which ended up being about 5 yards. I had no idea what I would do with it at the time, but I knew it would make something cute.


First thing I whipped up was this little number for my daughter:


My daughter wasn't in the modeling mood, so I had to use my mannequin, who my daughter calls "Maggie." The skirt doesn't quite fit the mannequin as well as my daughter, but you get the idea.


It's a drop-waist, layered twirl skirt with a double ruffle trim. This has become my most favorite kind of skirt to make. It's fun to make and easy to adjust to fit different sizes.


I paired the Alexander Henry fabric with a solid red cotton and this red & white floral print:


I love how the "flowers" in the print are little hearts. Perfect touch for Valentine's Day!

The other item I made with this fabric is my pillowcase-style dress, which I wrote about in detail here.


I love these cute little dresses. They can be layered over shirts with tights or leggings or just worn on their own as sundresses.

I've sold a couple of the skirts and the pillowcase dresses for some special little girls. I still have enough fabric left for a few more projects, but with Valentine's fast approaching, I think it will just go back into the "stash" until next year.


What kind of Valentine's Day projects have you been working on?

Wednesday, January 6, 2010

Triple Word Score

You know that feeling you get when you find THE perfect gift for someone? Something that you just know will take the cake? That's what happened with my mom's Christmas gift this year.


A few months ago, I stumbled upon this Scrabble Art idea posted on Crafster.org and I immediately knew that I had to recreate my own version for my mother.

This gift was perfect on so many levels: 1) She's a crafter and appreciates a great handmade gift; 2) she is a sucker for anything related to family history; and 3) she is a kick-ass Scrabble player. What could be better than a gift that combines three of her loves?


So I sat down with a piece of paper and figured out how many sets of letters I would need in order to spell all the names. I went with just my mom, dad, brother, sister, the four grandchildren, and myself. I did not include "in laws" because...well, they aren't blood related and we're all pretty sure one of them probably isn't permanent. Sounds awful, but hey...it's life.


I figured out that I would need two sets of letters, and the day after Thanksgiving I picked two Scrabble games at Target for $6 each. But they redid the board, and now it's these crazy purple, orange, and red colors....not anything that would fit with my mom's decor. So I hit ebay and found the older style board for $2.50 with $3 shipping. While I was on ebay, I also found that there are all kinds of sets of Scrabble tiles for sale, so that would be another resource for getting any extra letters you need for this project.


My parents' last name is in the wooden letter rack at the bottom. It took me about an hour to layout and connect all the names in a configuration that looked good on the board.


In the original picture on Crafster, they used a purchased, framed cork board to mount the Scrabble board. I couldn't find anything, so I had my husband build me a frame and cut me a piece of wood to the size I needed. Then I just stained everything in a color that I thought would look good in my mom's house. The entire thing is held together by massive amounts of hot glue.


When she opened it, she cried. And then my brother and sister promptly chimed in and told me that I suck and thanks for showing them up. I told them they just need to step up their game next year....